Saturday, March 3, 2012

Sock it to me


To help keep little Lana's legs warm and stylish I made her some leggings


Thank goodness her cast doesn't weigh her down from being such a cute model.
I love the polk a dot ones but the white ones will be cute to wear as tights for church.


Since her accident we have had a tough time figuring out what to dress Lana in to keep her leg warm.  Before the accident she was in footed PJ's nearly 24/7.  I love footed PJ's there a full wardrobe in one and I wish they made more of a selection in my size (you know you do too).  So we went on a hunt through her wardrobe to see if she already had anything that would work.  After a lot of digging and finding several missing clothing items we turned up nothing.  So it was on to hunt around Target for something that may work.  With no success of finding something big enough or thick enough I decided to blaze my own path and make some leggings.  They turned out to be exactly what we needed and were much easier to make then I had expected.  They only took me 10min. a pair max (I love projects like that)  Here's how it was done:


I started with one pair of women's tube socks ($2.00 as target)


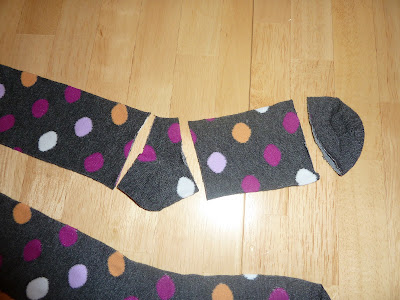
No measuring or exact cuts just cute a straight line just above the heel curve, just below the heel curve and just above the toe seam.


Toss the heel and toe part away you don't need them.  Now your left with a long tube and a short tube.  Take your short tube and fold it in half with wrong sides together and the top opening and bottom opening lined up.  You may want to pin at this point.  I kept having trouble with the pins getting in the way so I opted to do this step with out pinning.


Surge or zig zag stitch along the cut edges of the tube to connect the top and bottom of the small tube together but not sewing the tube shut.  
Helpful hint:  If you've never sewn with a knit fabric it can be a bit tricky.  Most important is to not pull.  Let the machine do the work so you don't get a gathered or ruffle look.  When setting your stitch for this step do set it for the longest stitch like you would for a basting stitch.  The needle will jump over more fabric and have a smoother stitch.  Do set your stitch to be wide but not the widest.  You'll want to be able to go bigger for the next stitch you complete.


Next turn the large tube inside out.  Place small tube inside large tube lining up cut edges.  Again you may want to pin at this point but I opted not to because I kept getting stabbed.


Now is when you increase your stitch width to be the widest or larger then the last sewing step.  Stitch along the top rim of the cut edges being careful not to sew the tube shut.


When you turn your socks right side out they will be a new stylish pair of leggings.  for visual and picture purposes I used white thread which you can see a little but if I had used black it would look better.  That's it!  Place on your love bug and enjoy.


Leggings are great for crawlers because it helps to protect their little knees from the harsh flooring.  When you make a pair send me a picture I'd love to see your creations.  I think my next pair I'm going to add ruffles down the side.  So many fun possibilities!

Monday, February 27, 2012

All Broken Up

I would have to say that sadly yesterday was officially the worst day of my life and my little 15months as well.  I'm not being dramatic it really was.  So here is the full story.  At 9:30 in the morning Lana woke up for the morning (she's a late riser) and Justin my husband went up to get here.  On his way down the stairs his feet went out from under him and he slipped.  He slid down 3-4 steps and on the way down Lana's leg got got in the spindles of the stair case.  I was in the kitchen and upon hearing the tumble I bolted in to the staircase.  


Immediately I knew something was wrong.  I undressed and examined her.  She was bruised but insistent on getting up so I let her try standing (bad idea).  It made her break worse and caused her bone to be pushed outward creating a bulge just above her ankle where it was broken.  Thanks to my mom being here with us we were able to dart right out the door.  We rushed her to urgent care but they took one look at it and sent us to the emergency room because it was too severe for them to deal with. 


The Mercy Methodist hospital out here is a small hospital and does not have a pediatrics department.  The emergency staff gave her pain medication to help her get comfortable and took x-rays to get an idea of what they were dealing with.  She broke both of the bones in her lower leg just above the ankle.  It may have broken a 3rd place but she's so small they aren't able to tell until she sees a specialist.  The breaks both went through her growth plate which means it could create problems with her growth as time goes on.  Since Mercy didn't have any Pedatrics avalible at the hospital were were at they had to call around to other Mercy hospital trying to find a pediatric Orthopedist who could set her let.  There were words used like open surgery, pins, plates, screws...YIKES!  After almost 8 hours of waiting (they had us in a comfortable room not the waiting room) we were transferred via ambulance to UC Davis in down town Sacramento.  Justin ran home to pick up some of our things and bring a video to the kids.  Check it out on Facebook here.


We were greeted by a waiting and ready staff when we arrived.  The poor baby had to be poked and prodded all over again to re-examine her.  By this time Lana was fully aware that anytime a stranger walked into the room they would want to touch her and she would break down.  She held up like such a trooper through it all.  She kept using the sign for "all finished" anytime someone would touch her.  The Orthopedist at Davis decided the best course of action was to put her under and see if he could set the bone and cast it.  It took two tries but they were able to get it set in a position that they were comfortable with it staying in until she can see an Pediatric Orthopedist to look at it.


We arrived home about 3:30 - 4:00 this morning and have been zombies ever since.  I'm running out now to get her pain medication filled and pick up a little umbrella stroller to use as her "wheelchair" as the kids call it.  We will be going back to Davis to see the Pediatric Orthopedist with in the week.  Thank you so much to all the friends that stopped by while we were gone to cheer up and check on the kids and my mom.  We left in such a rush everyone was in tears.  We are go grateful for the prayers and meals for our family.  We will pay it forward as soon as we are given the opportunity.  Much love to you all.

Thursday, February 16, 2012

Share the Love

I have been so inspired lately by all the crafters and sewers through pintrest and blogs.  So I set aside some time for myself to create.  For Valentines Day I made a cute bunting banner to add to our decore and a floral wreath to hang on the front door.  Both were simple and best of all cheap!


I had fun making it and putting it together.  This was my first applique-ing that I've ever done and now I'm hooked.  It is so easy and adds such a cute personalized touch.  I keep spotting things around the house thinking "oh, a monogram would look cute on that".  Addicting if anything. 


The wreath could not have been easier.  I purchased a round wreath and a dozen floral bunches from the dollar store.  With the hot glue gun I simply glued the head of the flowers on to the wreath.  That's it!  I have a command hook (LOVE those things!) hanging on my door for seasonal wreaths and I just hung it on that.  Easy as pie.


Sunday, November 27, 2011

Christmas countdown....3..2..1

As a child I would count down the days to Christmas and spend each and everyday anxiously awaiting for the day to arrive.  As the years have gone by and I have children of my own I can honestly say that I do not look forward to Chirstmas.   Sorry for all those fa-la-la-la-la-ers out there that can't wait for the holiday season I didn't mean to offend but I see Christmas bring out the worst in so many people.  The stress of gift buying, the long lines and impatiant patrons.  The crazy traffic and long hours in the kitchen cooking for hours so that everyone can gobble up their food and return to the "big game"  (when is it not a big game?)  Yes, I have  a little post Thanksgiving bitterness left over but really.  So my thought for today was, how can I make it fun this year for me and my children.  Even if it gives me the opprotunity to live vicariously through their experiances.  Second thought was how to do I bring the true spirit of Christmas into our home without feeling overwhelmed with projects and entertaining?  So I sent out on a web search for ideas.  My solution?  An easy to put together advent chain that gave simple scripture sudies and activites/ thought/ prayers to do everyday.


So far it has worked great.  Of course today is only day one but my eldest daughter who is only 6 was able to cut everything out on her own.  She and her four year old sister were able to staple all the pieces together and with in 30 min. It was completed and ready to be disassembled daily until christmas.  I opted not to attach any candy or treats to the chain because they get enough of that through out the holiday season and I felt that it took away from the overall message.  For any that are interested in making one for or with your little ones here is the directions.


Supplies:

- 4-5 pages of construction paper
- stapler
- daily count down print out.  Avalible Here


Directions:


1.  Cut out each square on the daily coutdown print out so you have 28 strips.


2.  Cut strips of construction paper the same with or slightly larger then the with of the countdown strips.
we cut along the with of the paper so each strip measured aprox 1"x 8.5"


3. Staple each count down strip to a strip of constuction paper.


4.  Loop first strip (begining with either the #1 or the #28) and staple it creating a loop or circle.


5.  Find next strip (#2 or #27) and loop it around the just created and staple.


6. repeat step 5 being sure to go in order until chain is completed.


Happy counting!


Monday, May 9, 2011

I'm really excited to release a new one of a kind, unique line of pacifier clips made with hand painted fabric from Bonita Rose.  Bonnie hand paints her own fabric lines in bold vibrant colors and patterns.  I was drawn to her art because of it's originality.  I could make a thousand items with her fabric and would never have 2 things look exactly alike.  You can find her items for sale on Etsy where she sells under the shop name BonitaRose.  You can check out the new line of clips that I created with her fabrics here.

Bonnie has a great blog where she lists great vintage finds and up coming projects that she creates.  The Hoop art project available on her blog is an easy fun way to bring her beautiful hand painted fabrics into your home.  For only $5.00 (yes it really says only $5.) she will ship you swatches of fabric that you can place in different size embroidery hoops and create a piece of art for your home.  I've seen this done with frames but never embroidery hoops.  Genius!  If your interested in participating in the project you can check it out here. 

There is even a creative jump start program that Bonnie herself has created.  A way to remove "artist block" and stir the creative juices with in to help you create the art that your capable of creating and enjoying.  The class is an E-course called "Do you want to color your world." And is a self paced workshop offered online.  For more information on anything you have read you can visit Bonnies' Blog at: alifeunrehearsed2.blogspot.com.


Saturday, February 19, 2011

A Few of My Favorite Things....

I know I have disappeared off the radar and if anyone noticed and missed me, I'm sorry.  I took the month of January and part of February off for my sanity.  But my life has settled down a little and I'm now a year wiser and more prepared then before to get moving.  So to start off my "new year"  I thought I would share some of my favorite things I found on Etsy while shopping for my birthday gift to my self.  Please keep in mind that these shops are not affiliated with me or have not even been contacted so I get no free stuff for mentioning them on my blog.  Maybe you think I'm crazy for not capitalizing but at least you know I'm honest when I say that I would buy them.

Blue Eyes INTENSIFY - Pure Organic Eye Color CollectionMy first find was this gorgeous make up from orglamix .  I am very much NOT a girly girl.  I do not do my hair daily and I wear make up maybe 4 times a month and that's usually to church.   But, this make up line has me super jazzed to start spending a little more time on me.  The beautiful colors and no lack of sparkle is what caught me eye.  The prices are super reasonable and their all organic too!  Need I say more?  I am a very faithful user of one makeup line but with these colors and a product guaranty of satisfaction.... I just may have cheat.
Blue Eyes POP - Pure Organic Eye Color Collection
orglamixColorlicious -  Eye Shadow of the Month ClubColorlicious -  Eye Shadow of the Month ClubChamomile - Pure Organic Mineral Eye ColorChocolate Chip Cookie - Pure Organic Mineral Eye ColorSpiritualize Collection - Pure Organic Mineral Eye ColorTwilight Garden Collection - Pure Organic Mineral Eye Color


To go with my beautiful new face I would need a new pair of ear rings to frame it all.  In comes beachflowerdesigns.  Based out of Plainfield, IN Allison creates stunning one of a kind pieces of jewelry from earrings, to bracelets and necklaces.  It was her earrings that first drew me into her shop.  I am a sucker for things that sparkle, especially things that sparkle in multiple colors.  I love her use of such uniquely shaped stones.  You will not find jewelry like this in a chain store.  The thought that no one has a pair exactly like mine gets me giddy.  Her prices are super reasonable and you only have to pay shipping on one item.
Spectra - Rainbow Swarovski Rivoli and Sterling Silver Earrings.Peacock - Aqua Sphinx Swarovski Flat Briolette and Sterling Silver Earrings.Caladium - Wire Wrapped Crystal Electra Baroque Pendant and Antique Brass Earrings.


To carry around my new make up and jewelry I would need a gorgeous new purse.  I have a ritual of purchasing a new purse for my birthday each year to make sure I'm not too boring and out of date.  I have to be honest though I buy something cheap, usually on sale and with a coupon even if I can.  If I wasn't such a thrifty shopper and I was able to justify to myself spending the money I would buy a bag from daphnenen in a heart beat.  She is an artist/designer out of New York who understands the versatile role that a purse must play in a women's life.  She creates limited edition purses (pieces of art) with style and function in mind.  With the use of fine italian silks and fabrics, color and textures Daphne designs and creates each by hand (by that I mean her and her sewing machine).  The blue and green circle purse is even made with handmade fabric.  For now I will just window shop until the day comes I can justify and commit to one of these beautiful designs.
ONE OF A KIND Clutch in black brown and beige Italian tapestrysmall and sexy bag hand painted on silkhandmade hobo ,tote shoulder bag 2 way bag italian tapestry3 WAY BAG - WEAR IT OVER THE SHOULDER, BACKPACK,OR HOBOBLACK AND GREY SMALL AND SEXY BAG MADE FROM ITALIAN TAPESTRYSMALL AND SEXY PLEATED BAG IN BLACK AND BROWNHANDMADE LARGE PLEATED BAG  ITALIAN TAPESTRYhandmade hobo ,tote shoulder bag 2 way bag italian tapestry


Being a mom I require pieces of clothing that are versatile, easy to throw on and off and can be machine washed.  With those criteria in mind I set out to find something new that I could add to my collection.  I came across loads of beautiful creations but it was the work of annajoyce that caught my fancy.  It was the colors and scrappy look that I couldn't pass up.  Let me please clarify, I am a crafter and scrap-booker by nature and the way her pieces are put together reminded me of paper piecing.  A technique used commonly by scrap-bookers but here used with fabric.  The sweater I love looks to me like a scrapbook page that you can wear.  Once I entered her shop I found that her talent didn't begin and end with clothing but went on to include home decor pieces as well.  Even better is that her products are eco-friendly.  I can see a new sweater hanging in my closet in the near future.
Spring Blossom Hoodie, Warm Heather Gray, Small, Medium, Large and XLargeSpring Vine Hoodie, Charcoal Gray, Size Small, Medium, Large or XLargeMrs. Coral Bird Pillow, Chocolate Pin Dot, 20 x 20Holiday Sale Blue Calico Love Bird Hoodie, Charcoal Gray, SIZE LARGEMr. Blue Bird Pillow, Chocolate Pin Pot, 20 x 20


Finally as with every good shopping trip I started to get hungry and headed for something I could snack on.  I was amazed to find so many yummy things available on Etsy.  You can purchase cupcakes, cakes, cakes in a jar, and treats of any type, the list goes on and on but I had to settle on one.  I decided I wanted to sink my teeth into something from SweetsIndeed where candy becomes art.  The use of candy on a skewer brings a new life to candy that I haven't enjoyed since I was a kid.  Instead of purchasing flowers next time I think I'll purchase sweet skewers from here.  They can be ordered like a bouquet of roses but you have the fun of enjoying them with your eyes and your tummy.  Though the shop inventory is limited right now there are new items that arrive with each holiday and calendar event.  I do plan on offering these at my kids's birthday parties.  Very sweet indeed.
Valentine Lollipop Sweet Skewer - 6Custom Listing for fabricfanaticSummer Special Sweet Skewers - 6Dragonfly and Butterfly Candy Kabobs - 21/2 lb. Valentine Candy Kabobs - 2Valentine Mini Sweet Skewers - 24Peppermint Swirl Holiday Sweet Skewer - 6Mini Horse Sweet Skewers - 3


So there you have it.  As sung by Julie Andrews "These are a few of my favorite things".  It never ceases to amaze me at the endless amount of talent that can be found on Etsy.  Though I am on the web site daily for business I have to limit my self to the amount of "window shopping" that I do.  Otherwise I would spend all day looking at the beautiful creations made by others.  So what did I end up getting for my Birthday you ask?  Well, a  new purse of course.  My kids say it looks like an alligator but I like it.
A new sewing machine and a new camera.  But best of all my daughter shared our family for her kindergarten sharing time (show and tell).  And that truly made my day.