Saturday, March 3, 2012

Sock it to me


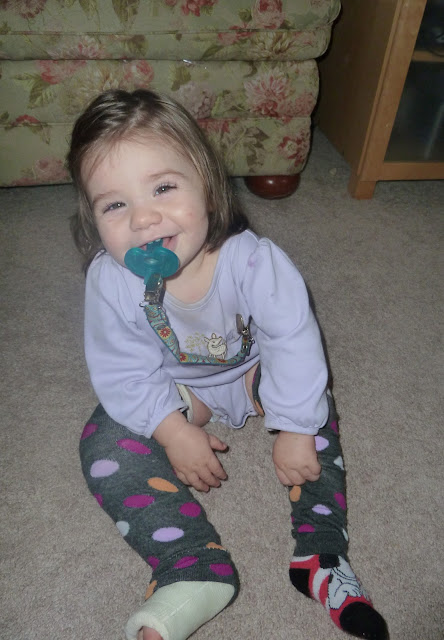
To help keep little Lana's legs warm and stylish I made her some leggings


Thank goodness her cast doesn't weigh her down from being such a cute model.
I love the polk a dot ones but the white ones will be cute to wear as tights for church.


Since her accident we have had a tough time figuring out what to dress Lana in to keep her leg warm.  Before the accident she was in footed PJ's nearly 24/7.  I love footed PJ's there a full wardrobe in one and I wish they made more of a selection in my size (you know you do too).  So we went on a hunt through her wardrobe to see if she already had anything that would work.  After a lot of digging and finding several missing clothing items we turned up nothing.  So it was on to hunt around Target for something that may work.  With no success of finding something big enough or thick enough I decided to blaze my own path and make some leggings.  They turned out to be exactly what we needed and were much easier to make then I had expected.  They only took me 10min. a pair max (I love projects like that)  Here's how it was done:


I started with one pair of women's tube socks ($2.00 as target)


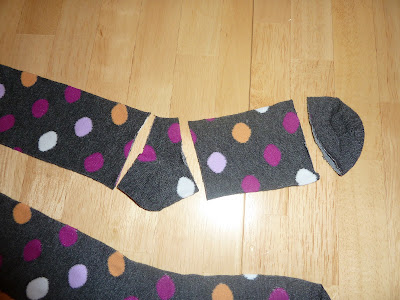
No measuring or exact cuts just cute a straight line just above the heel curve, just below the heel curve and just above the toe seam.


Toss the heel and toe part away you don't need them.  Now your left with a long tube and a short tube.  Take your short tube and fold it in half with wrong sides together and the top opening and bottom opening lined up.  You may want to pin at this point.  I kept having trouble with the pins getting in the way so I opted to do this step with out pinning.


Surge or zig zag stitch along the cut edges of the tube to connect the top and bottom of the small tube together but not sewing the tube shut.  
Helpful hint:  If you've never sewn with a knit fabric it can be a bit tricky.  Most important is to not pull.  Let the machine do the work so you don't get a gathered or ruffle look.  When setting your stitch for this step do set it for the longest stitch like you would for a basting stitch.  The needle will jump over more fabric and have a smoother stitch.  Do set your stitch to be wide but not the widest.  You'll want to be able to go bigger for the next stitch you complete.


Next turn the large tube inside out.  Place small tube inside large tube lining up cut edges.  Again you may want to pin at this point but I opted not to because I kept getting stabbed.


Now is when you increase your stitch width to be the widest or larger then the last sewing step.  Stitch along the top rim of the cut edges being careful not to sew the tube shut.


When you turn your socks right side out they will be a new stylish pair of leggings.  for visual and picture purposes I used white thread which you can see a little but if I had used black it would look better.  That's it!  Place on your love bug and enjoy.


Leggings are great for crawlers because it helps to protect their little knees from the harsh flooring.  When you make a pair send me a picture I'd love to see your creations.  I think my next pair I'm going to add ruffles down the side.  So many fun possibilities!

Monday, February 27, 2012

All Broken Up

I would have to say that sadly yesterday was officially the worst day of my life and my little 15months as well.  I'm not being dramatic it really was.  So here is the full story.  At 9:30 in the morning Lana woke up for the morning (she's a late riser) and Justin my husband went up to get here.  On his way down the stairs his feet went out from under him and he slipped.  He slid down 3-4 steps and on the way down Lana's leg got got in the spindles of the stair case.  I was in the kitchen and upon hearing the tumble I bolted in to the staircase.  


Immediately I knew something was wrong.  I undressed and examined her.  She was bruised but insistent on getting up so I let her try standing (bad idea).  It made her break worse and caused her bone to be pushed outward creating a bulge just above her ankle where it was broken.  Thanks to my mom being here with us we were able to dart right out the door.  We rushed her to urgent care but they took one look at it and sent us to the emergency room because it was too severe for them to deal with. 


The Mercy Methodist hospital out here is a small hospital and does not have a pediatrics department.  The emergency staff gave her pain medication to help her get comfortable and took x-rays to get an idea of what they were dealing with.  She broke both of the bones in her lower leg just above the ankle.  It may have broken a 3rd place but she's so small they aren't able to tell until she sees a specialist.  The breaks both went through her growth plate which means it could create problems with her growth as time goes on.  Since Mercy didn't have any Pedatrics avalible at the hospital were were at they had to call around to other Mercy hospital trying to find a pediatric Orthopedist who could set her let.  There were words used like open surgery, pins, plates, screws...YIKES!  After almost 8 hours of waiting (they had us in a comfortable room not the waiting room) we were transferred via ambulance to UC Davis in down town Sacramento.  Justin ran home to pick up some of our things and bring a video to the kids.  Check it out on Facebook here.


We were greeted by a waiting and ready staff when we arrived.  The poor baby had to be poked and prodded all over again to re-examine her.  By this time Lana was fully aware that anytime a stranger walked into the room they would want to touch her and she would break down.  She held up like such a trooper through it all.  She kept using the sign for "all finished" anytime someone would touch her.  The Orthopedist at Davis decided the best course of action was to put her under and see if he could set the bone and cast it.  It took two tries but they were able to get it set in a position that they were comfortable with it staying in until she can see an Pediatric Orthopedist to look at it.


We arrived home about 3:30 - 4:00 this morning and have been zombies ever since.  I'm running out now to get her pain medication filled and pick up a little umbrella stroller to use as her "wheelchair" as the kids call it.  We will be going back to Davis to see the Pediatric Orthopedist with in the week.  Thank you so much to all the friends that stopped by while we were gone to cheer up and check on the kids and my mom.  We left in such a rush everyone was in tears.  We are go grateful for the prayers and meals for our family.  We will pay it forward as soon as we are given the opportunity.  Much love to you all.

Thursday, February 16, 2012

Share the Love

I have been so inspired lately by all the crafters and sewers through pintrest and blogs.  So I set aside some time for myself to create.  For Valentines Day I made a cute bunting banner to add to our decore and a floral wreath to hang on the front door.  Both were simple and best of all cheap!


I had fun making it and putting it together.  This was my first applique-ing that I've ever done and now I'm hooked.  It is so easy and adds such a cute personalized touch.  I keep spotting things around the house thinking "oh, a monogram would look cute on that".  Addicting if anything. 


The wreath could not have been easier.  I purchased a round wreath and a dozen floral bunches from the dollar store.  With the hot glue gun I simply glued the head of the flowers on to the wreath.  That's it!  I have a command hook (LOVE those things!) hanging on my door for seasonal wreaths and I just hung it on that.  Easy as pie.